Showing posts with label tutorial. Show all posts

Tuesday, 9 July 2013

Makie Me a T-Tunic

Alrighty!

Today we're going to make a very snazzy t-tunic (with of course, the option to lengthen into a dress) that'll be a useful little number for your Makie's wardrobe.
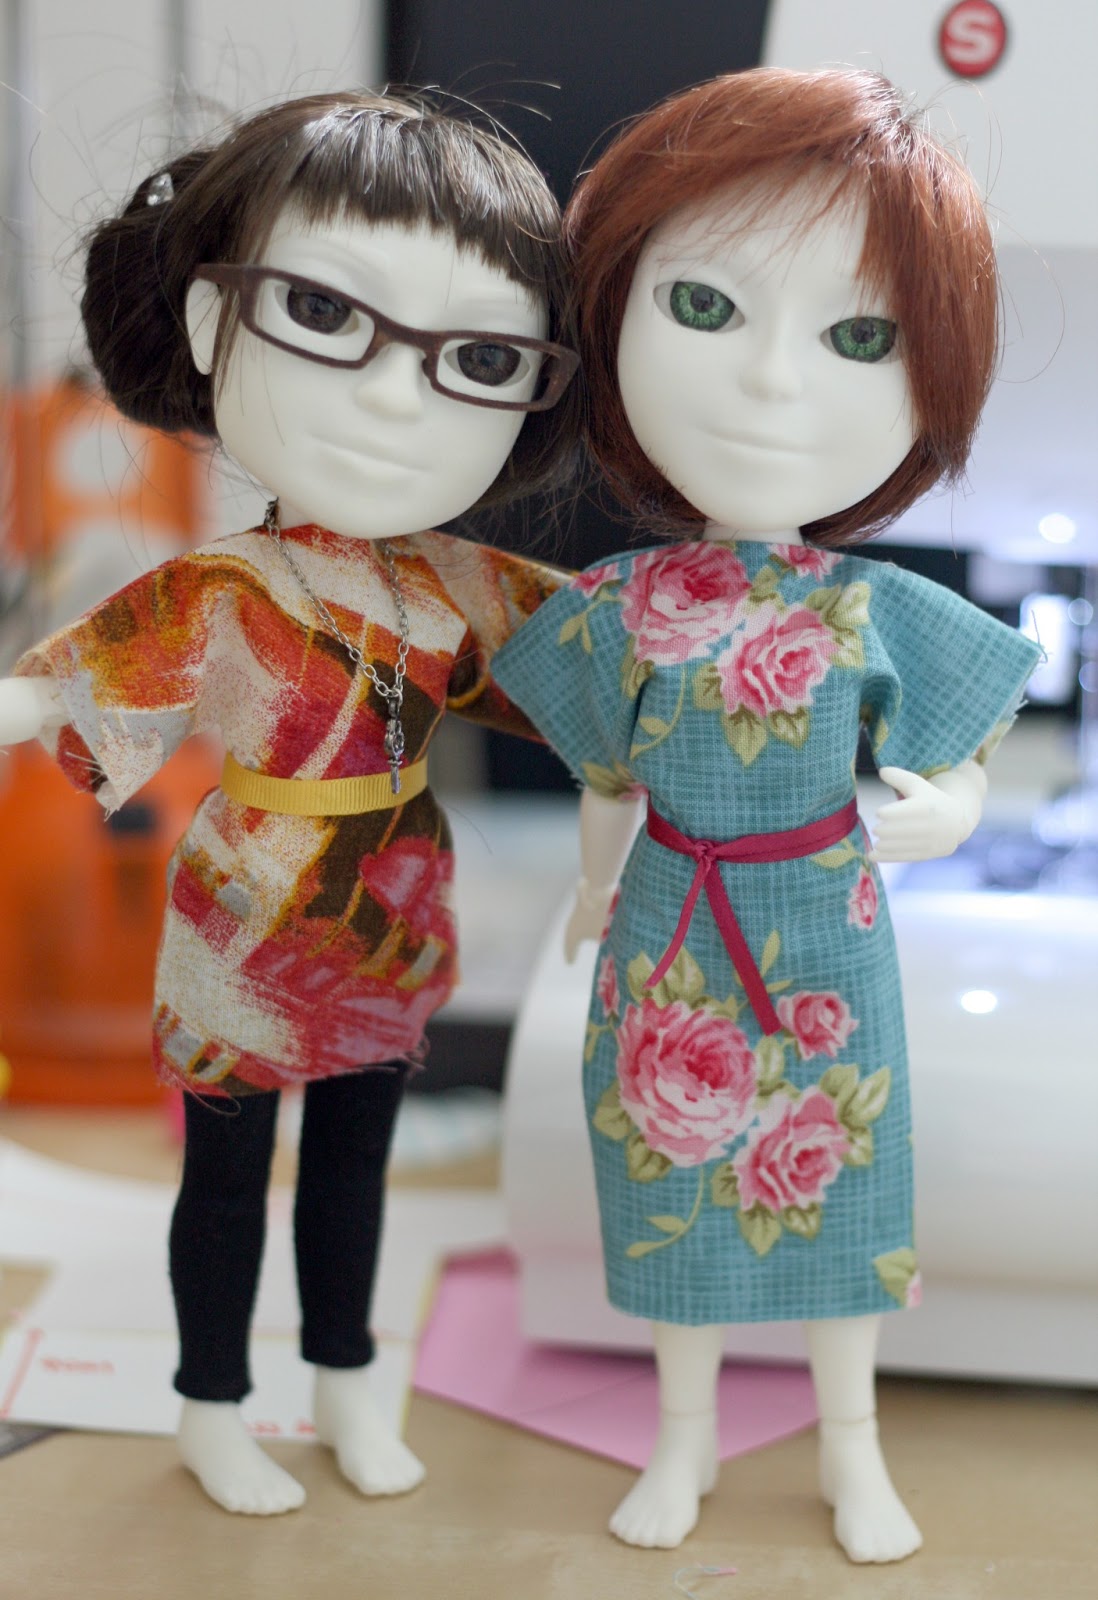

You will need:

  • Fabric scrap, about a 24 x 15cm rectangle for dress length.
  • Paper to make your pattern from. 
  • Ruler.
  • Pencil. 
  • Needle and thread or a sewing machine. 
  • An iron.
  • A bit of ribbon. 
  • A Makie to model your creation!
First off, make your pattern: 


The orange lines give you the measurements, the yellow lines are where you will cut. Cut out your pattern paper, being sure to make the midpoint of the top edge and 1.5cm either side of it. This will make your neck hole. 

Next, with your fabric folded so the right sides are together, cut out two of the t-shapes. You might like to finish the sleeve and hem edges at this point; it's easier. I have to confess, I left mine rough. Too nice weather for faffery!


Keeping the right sides together, sew along the yellow lines. Remember to stop and start at the neck hole! You are aiming for a seam allowance of about 0.5cm. 

Turn your tunic inside out and press flat with a hot iron. Mind your fingers! 

Now, take your Makie model and pop off her head and arms. Slide the tunic onto the torso and replace the severed limbs. 

If you're feeling brave, you could let your Makie have a rummage in your ribbon and trims box to find a belt that they like. Tie it on to give the tunic some more shape. 

Now you have to go and make one for your other Makie! 

If there's anything you're not clear on, drop me a comment! Feel free to send photos of your finished tunics, I'd love to see them. 

Monday, 8 July 2013

Egads!

Yup yup. We're having a heatwave here in the UK, and you've got to make sure your clothes are up to scratch. What could be cooler than a nice floral summer dress or a jazzy little tunic?


Tomorrow I'll be posting a tutorial so's you can create your own fashions exclusively for your Makie.
See you then!

Saturday, 30 March 2013

Makie Me: A Comfy Kimono


Here at Makie Couture, we're big fans of sleepwear. In fact, we're often to be found securely in our snuggly pyjamas before the clock has struck six pm.

Plink, about to crash out in her PJ's
This tute'll demonstrate how to make a comfy kimono for your Makie (or Blythe) to wear when they're in the mood for some mega lounging around.
Comfy, cosy and fab. 

You will need:

  • A piece of fabric, about 10 inches by 6 inches. 
  • Some ribbon, about 18 inches long. 
  • A piece of A4 paper
  • Ruler and pencil
  • Chalk pencil
  • Needle and thread; you could use a sewing machine. 
  • An iron is handy. 
First of all, make your pattern pieces. This is dead simple, they're both rectangles. 2 x 2" for the sleeves, 3.5 x 5" for the body piece. 

The sleeve piece is the small piece. The body piece is the big piece.
Note that both pieces need to be cut on the fold of the fabric.
Fold your fabric in half, align your body piece against the fold and cut out.
Then cut out two sleeves, again making sure that each is on the fold.

Unfold your pieces and mark the midpoints with your chalk pencil.

Red dots = midpoints of fabric. 

Matching the midpoints and with right sides together, sew the sleeve pieces to the body piece with a scant 1/4 inch seam.
I've already finished the sleeve openings here.
It's easier to do it at this point than when the kimono is assembled!

Flip open the sleeves like the pages of a book and iron flat. You should have a cross shape like below.

Folding the kimono with right sides together to make a 'T' shape, sew along the red lines. This completes the side and underarm seams.
If you're using a sewing machine, pivot at the corners.
For a neat finish, snip at a 45 degree angle into the underarm corners.
Don't do what I did and snip half of the kimono because you are TIRED and ILL. 

On what is to be your front, measure and mark the middle with your chalk pencil. Where the neck opening is to be, mark 3/4 of an inch on either side in a 'T' shape.
Marking the opening is really, really helpful :) 
Cut along the chalk lines and turn your robe the right way out. Fold back the neckline and press with your iron. 

Already looking good! 
Nearly there! All that's left is to apply ribbon to the open edge. It might be neater to do this by hand, but I used a decorative zig-zag stitch and a bit of caution. If you haven't already, neatly hem the bottom and sleeve openings.
Pink makes us HAPPY. 
You should have just enough ribbon left over to make a tie belt. Slip on your lovely new robe and go relax!

It's loafing time!
Just need to nick Melchie's fluffy bunny slippers...


Friday, 29 March 2013

Psssst!

Wanna know how to make one of these?
Kimonos are perfect for Bank Holiday loafing
Come back for a Makie Couture Easter Weekend Tutorial tomorrow!
We're off to enjoy some Hot Cross Buns :)

Sunday, 6 January 2013

Tutorial: Turning the Hoodie into a Wolf Suit

Yes yes. Calling it a tutorial might be a little bit rich, but we'll take a bit of a liberty.

So here's the lovely Melchie modelling the prototype wolf suit: 

Rawr!
Rawr, innit?
For ease of finishing, the suit is made from felt. This means you don't need to worry about hemming edges and other fiddly stuff.

To make your own wolf suit, you will need: 
  • The MakieLab hoodie pattern and instructions, which you can get here. You will be using the FRONT, SLEEVE and HOOD pieces only. We will not be attaching the hood casing. I only use one of each piece and cut out with my fabric doubled. 
  • Some A4 paper
  • Pens and a ruler
  • Fabric marking pencil
  • Felt fabric measuring about 40 x 30 cm
  • Felt scraps to make ears and a tail. You don't have to do a wolf! 
  • Snaps or velcro to close
  • Thread and needles. Although I used a sewing machine, you could do this entirely by hand
  • Scissors
Are we ready? Let's go!

Print off and cut out your hoodie pattern, making sure you've got the right scale.

Take the FRONT hoodie piece, cut it in half along the centre front line.  Reconstruct the pieces on your piece of A4 paper, but with a 1cm gap between them: 

I find a bit of double-sided sticky helps to keep these in place whilst you draw the rest of the pattern.


Using your pens and a ruler, you now need to draw around your pattern pieces to make one piece that looks like the shape in this picture: 

The TAIL goes on the back piece, the OPENING goes on the front piece.
To find the mid point, measure along the original bottom edge, then use this to work out where the rest of the lines go. 
You'll note I'm only using the front piece of the hoodie pattern. The original is slightly asymmetrical, in that the back is narrower and the sleeve edge a little differently shaped, but I find you need the width in a non-stretchy fabric and the sleeves fit just fine.
Cut out your trouser legs. The gap in mine measures 1cm in width at the ankles.

Next, take your hood piece. Draw a line where you'll be attaching your ears. I did mine 6cm back from the upper point of the hood.

I get sharpie EVERYWHERE when I use it. 
Then take your sleeve piece...
Nice to know, isn't it? 
Once you've got your pattern pieces, read all these instructions three times before proceeding. I used 0.5cm seam allowances throughout my construction, and the fit is pretty good.
  • Cut two of every piece from your fabric. Remember that if you're cutting on a single layer, you'll have to flip your hood pieces so you get two opposite-shaped pieces (alternatively use both of the hood pieces from the original MakieLab pattern). 
  • Mark your front opening, tail slit and ear slits on the fabric pieces using a chalk pencil.
  • Snip the inverted 'Y' shape on the front piece. Fold the raw edges to the inside and topstich along the opening in a 'U' shape. This gives you an easy way to get the Makie in and out of the suit.  
  • Snip along the tail slit opening on the back piece. Make your tail, insert it into the opening on the right side. 
  • Fold the back piece in half, right sides together, sandwiching the tail, and sew the opening closed 0.5cm away from the edge. 

Insert the tail from the right side, then fold the whole piece in half along the line of the slit.
Sew to close the gap and fix the tail
  • Snip the ear slits and insert the ears in the same way as the tail. If your ears have contrasting 'inner' bits, make sure they're facing the right way before you sew!

Make sure your contrasting inner ear bits are facing forwards, towards the hood opening.
Fold the hood piece in half along the line of the slit, like you did for the back piece. 
Sew across the base of the ear to close the opening.
Repeat in exactly the same way on the other hood piece :) 

Once the ears are inserted...
  • Follow the MakieLab instructions for sewing the sleeves to your front and back pieces.
  • When you get to sewing the underarm seam, simply continue along the side seam down to the bottom of the trousers. 
  • Sew the inner leg seam and turn the suit the right way out. 
  • Sew the hood pieces together as per MakieLab instructions. DO NOT SEW THE BOTTOM EDGE OF THE HOOD INTO A RING, leave it open. 
  • Pin the hood to the suit with right sides together, leaving an equal gap at each edge. I find this is easier if you find the midpoint of the back piece and pin this to the hood seam, then attach everything equally
Blue arrow shows the midpoint of the back piece.
Match this up with the hood seam to place your hood in the middle.
This is the point where you try on to your Makie. Trim the sleeves and trousers to a good length (this is part of the beauty of using felt to make this costume; you don't have to worry about hems and cuffs!), and trim the hood edge away from the face if you need to. 

Once you're happy with the fit...
  • Attach your snaps or velcro to the front openings. 
  • Pose.
  • Prowl. 

Rawr!
If you want, you could extend the sleeves over the hands and attach claws.
Eyes and a nose on the hood could look cute.
Why not attach a row of teeth around the hood opening! 
Taadaa! We're done. Have a cup of tea! Oh, and take photos and share them!

If there are any bits you're not sure on, chuck a question in the comments and I'll do my best to help.  

Wednesday, 10 October 2012

Paper Hat: The Tutorialinginginging...

Goodness. We're going to end the run of hat-based tutorials and postings soon, I promise. It's probably something to do with the change in the weather! As the evenings draw in and the wind gets... erm... windier... there's nothing better than curling up and making some outerwear!

Anyway. As promised, here's a guide to making your very own paper hat, Makies for the wearing of. This is adapted from a classic paper hat fold you can do with a £5 note, either for leaving as a pretty tip or for annoying bus drivers. Hahaha.
'loes Sailor
Smart, eh?
You will need:

  • Fabric measuring 12.5cm by 20.5cm (roughly 5" by 8 1/4")
  • Iron and ironing board
  • Needle and thread
  • Fray check
  • Scissors
Depending on the wibblyness of your fabric (technical term), you might need to interface it for added stiffness (fnaar). I would advise that you fold up a test hat and see what your fabric is going to do; although feeling flimsy when flat, the quilting cotton I used is surprisingly sturdy once folded and interfacing is really not needed.

Okay! Let's get folding. First thing, a warning:


You will be using a iron to crease all of your folds. Although you could use the heat only, you will most likely need steam to set the creases. The steam shoots out in all directions. 
You are very, very likely to get burnt fingers if you're not paying attention to what you are doing! 
Do not attempt to make these hats with small children, pets or wayward Makies distracting you! 


Crystal? Right. Read through all the steps, then have a go. If you're not clear on how the folding works, try it with a piece of paper before you move on to the fabric.

First, lay your fabric face down on the ironing board. Fold over 0.5cm ish at each end. This gives you a nice finish on the bottom opening of the hat.
Paper Haaaaatses
Flat, flat, flat. Fold ends and iron.
Fold the fabric in half, pattern out. Iron the fold. Lay folded fabric on your ironing board, opening towards you.
Paper Haaaaatses
Opening at the bottom, or you'll not get into your hat. 
Fold in the corners and iron flat.
Paper Haaaaatses
Find the middle first!
Bring the open edges of the fabric up over the triangle. Iron. It's easier to do one side, then flip the hat over and do the other.
Paper Haaaaatses
Opening still towards you, yes! 
Fold the nice finished edge down to make the outside bottom of the hat. Iron. This is where you're most likely to burn yourself.
Paper Haaaaatses
Basically fold the flat bit in half, so's there's a nice finish. Flatten with the iron. 
Congratulate yourself on having some fingers left. Switch off the iron, breathe a sigh of relief.
To finish the hat, you need to do a few little sewing stitches at the red dots. I just overcast a couple of times and make sure it's secure. For a smart finish, trim the edges marked by the arrows and apply a little fray check to stop... well. Fraying.
Paper Haaaaatses
Stitch through all layers at the dots to hold the hat together. Trim and fray-check at the arrows.
Hats don't have to be just one size! As long as you keep the proportions, you can make any size you like. The tiny hats started off about 7cm wide and have got a hairgrip stitched into the bottom to keep them in place. They could do with a little wire in the brim to hold them open... time to experiment!
Plink, play nice.
"Little haaaaaaaaatses!" "Hey! Plink! Play nice!"


Thursday, 27 September 2012

Tutorial: Making the Fuzzy Grey Hat


Well, I've published one crochet pattern on the blog, so I might as well cement my descent into middle-age-ness by publishing this one too...

Fuzzy Grey Hat
A dodgy photo requiring changing to B+W? NEVAH! 

To make your very own Fuzzy Grey Hat, you will need:
  • 4.0mm crochet hook
  • Fuzzy Grey Yarn! I used a skein of Debbie Bliss Alpaca that Bagpuss the cat had decided to have a party with some time ago. He's not yet been forgiven. It took well under 1/2 a skein to make this hat. 
  • Scissors.
  • To know how to do a magic loop cast-on, single and double crochet.
Once again, I'm not going to be teaching you how to crochet. There are some excellent books out there on the subject (see Bear Hat post for details) or loads of videos on You Tube for you to peruse. I find crochet much easier to knitting and it was really, really fast to pick up. 

Here we go then... arm yourselves. Have a read through all of the instructions before you start... 

Create 6 single crochet stitches into a magic loop. Pull the loop tight. 
Increase [Inc] all six stitches using single crochet; this means you work two single stitches into every stitch, giving you a total of 12 stitches.
Single crochet 1 into the first stitch, then Increase 1 into the next stitch around the 12 stitches [Sc1, Inc 1]  

For the next round, you're first going to chain 3 stitches. Then work in double crochet in the increasing pattern of  [Dc 2, Inc 1]. Your first double crochet stitch will be into the 4th loop from the hook (i.e don't work into the chain you've just created). For the increases, simply work two double crochet stitches into the same loop of the stitch on the row below.

Next round, back to single crochet: [Sc 3, Inc 1]
Next round we're doubling! Remember to chain 3 to start, then [Dc 4, Inc 1] 
Next round! Singles again. [Sc 5, Inc 1]
Increasing done, phew! Chain 3 stitches and work a round of all double crochet, then a row of all singles to finish. Tie off and weave in ends.

You may find you want less height on the hat than this; if you do, leave out the last doubles and just work another single round.
For a more snug fit, you can take a decrease at a couple of points in the last two rounds. I did this in the double row at 2 opposite points.

Now have fun embellishing your hat. I think a cluster of beads would look great... or how about covering the whole darned lot in sequins? Rock and roll! 

Monday, 24 September 2012

Tutorial: Making the Bear Hat

No sooner was the Bear Hat posted on the Makie Forum than a pattern was demanded!
Wet Sunday
Rawr!
I'm not going to go into how you crochet here; bigger brains than mine have produced some really good books on the subject. The Happy Hooker by Debbie Stoller is how I taught myself, and Creepy Cute Crochet is a really good introduction to simple amigurumi techniques, which is how the Bear Hat was created.

You will need:
  • 4.0mm crochet hook
  • Aran weight yarn (I used Debbie Bliss Cashmerino Aran, which is all fuzzy)
  • Scissors
  • Felt Scraps, co-ordinating thread to stitch them on with. 
  • Teddy bear eyes, these are 8mm ones
  •  Patience and the ability not to crochet yourself to your work. 
Pattern as follows: 

To make the hat:

Create 6 single crochet stitches into a magic loop. Pull the loop tight. 
Increase [Inc] all six stitches; this means you work two single stitches into every stitch = 12 st. 
Single crochet 1 into the first stitch, then Increase 1 into the next stitch around the 12 stitches [Sc1, Inc 1] 
For the next round [Sc 2, Inc 1] 
Next round [Sc 3, Inc 1]
Next round [Sc 4, Inc 1] 
Next round! [Sc 5, Inc 1]
Work around the brim 3 or so times until your hat is the depth you want.  Tie off and weave in ends. 

For the ears:

Decide where you want the ears to be placed, then working in the holes between the stitches of the hat, pick up 4 single crochet stitches for the base of each ear.
Work backwards and forwards as follows:
First row: Chain 1 [Sc 1, Inc 1, Inc 1, Sc 1] = 6 stitches
Next row: Chain 1, Sc all stitches. 
Next row: Chain 1 [decrease 1, Sc 2, decrease 1] = 4 stitches, tie off and weave in ends.

If you're not happy picking up stitches, then you could always work the ears separately off of a chain of 4 stitches, then sew 'em on afterwards. 

Wet Sunday
I can bear-ly believe it!
Once the ears are on, all you need to do is cut your nose shape and stitch it on, then push the eyes through the holes between the stitches. Have fun adding whiskers, changing ear shapes and experimenting with different colours!

It would be pretty easy to make ear flaps for these hats! You just pick up stitches along the brim, work back and forth for a few rows, then decrease at the edges to a point. Finish off by adding a doubled strand of contrasting colour wool and braid to a pretty pleat. 

Saturday, 22 September 2012

Sewing for Humans: Stethoscope Cover

A bit of a digression from Makie-ness today, but I decided it's time to make something for myself again!

Us doctors are rather fond of our stethoscopes. They're an essential bit of kit for day-to-day work, and they get a fair bit of abuse.

Unfortunately, my previous model took rather too much abuse over the last 4 1/2 years, and has just ended up doing the above...
Untitled
Boooosplit.
Yeah. Split. This means the acoustic is stuffed and I can't hear a thing. Not so good when you're trying to hear whether or not there's a pneumonia or heart murmur. It's happened because I tend to drape my tubes around my neck, where the lipids from my skin have reacted with the plastic and made it brittle.

So after a delve into the bank account for a new model (ouch), I've decided that a funky fabric solution is needed to avoid further splittage and financial distress.
Untitled
Classy!
If you've got a medic in your life, why not make them one of these? It's dead easy.

You will need:
  • Fabric strips 2.5" wide, 14" long. 
  • Needle and thread
  • Iron
  • Snap fasteners
A sewing machine is helpful.

First, gather your fabrics. These are from a Moda "Jelly Roll", which is a type of quilting collection. They're the perfect width for making stethoscope covers. 
Untitled
Funktastic

With your trusty iron and without ironing your fingers, fold all the edges under 1/4" and press. 
Untitled
Fold and iron.

Take a moment to get distracted by the squirrel attacking the bird feeder in the garden.
Naughty Squirrel
You are a squirrel, not a woodpecker. Note the bemused pigeon.

Sew around the edges. I find you get a neater finish if you do the long edges before the short edges. 
Untitled
From sewing and snapping.

Grab a needle and thread, chuck something suitable on netflix and sew on your snaps. One on each end and one in the middle will do. 

Attach the cover to the stethoscope and go strut your stuff on the wards. When the fabric gets a bit grubby, just snap it off and sling it in the washing machine. 
Untitled


Sunday, 2 September 2012

Anyone...

...for a Makie apron tutorial?
Cooking with Plink: Quicheything
It's got a heart. She wanted a skull and crossbones. 

On my list of things to do once this week is safely over!