 |
| Tiny pieces! |

Showing posts with label patterns. Show all posts
Showing posts with label patterns. Show all posts
Monday, 29 October 2012
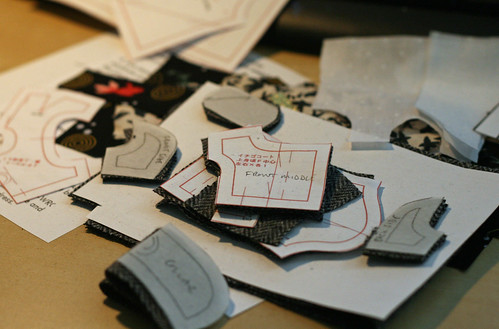
Snip... snip...
Today's been a bit of a cutting out day. Which means that tomorrow might just be a sewing day!
Hopefully we'll be able to have a bit of a fashion show later this week.
Monday, 23 July 2012
Makie Me a SUNNY SUN DRESS!
Aaah, the birds are singing, the sky has shed its usual sort-of-greyish colour for a gloriously glowing blue, and humans and Makies alike are out enjoying toasting their bones and, of course, looking faaaabulous at the same time!
This tutorial will help you create a stunning sun dress with multiple possible customisable variations. It's so ridiculously simple that you can stitch one up by hand in half an hour... and probably in less than 5 minutes by sewing machine. But who wants to be inside with a sewing machine today, I ask you?!
I used some cotton scraps for this version but just about any fabric you've got lying around will be fine. If you're one of these people that doesn't have fabric lying around (weirdo), you can pick up 'fat quarters' of all sorts of fabric online. These are the perfect size for creating Makie clothing and are generally very economical; prices range from 50p to £4 ish. Quilting cotton is excellent for beginners. It's easy to sew, cheap and comes in all sorts of exciting prints.
Here's most of the things you'll definitely need, and some things you really, really won't:
Essential supplies:
Optional but highly recommended supplies:
 |
| Prof Plink prepares to leave the library and head into the great outdoors. |
This tutorial will help you create a stunning sun dress with multiple possible customisable variations. It's so ridiculously simple that you can stitch one up by hand in half an hour... and probably in less than 5 minutes by sewing machine. But who wants to be inside with a sewing machine today, I ask you?!
I used some cotton scraps for this version but just about any fabric you've got lying around will be fine. If you're one of these people that doesn't have fabric lying around (weirdo), you can pick up 'fat quarters' of all sorts of fabric online. These are the perfect size for creating Makie clothing and are generally very economical; prices range from 50p to £4 ish. Quilting cotton is excellent for beginners. It's easy to sew, cheap and comes in all sorts of exciting prints.
Here's most of the things you'll definitely need, and some things you really, really won't:
 |
| The cake. OH, THE CAKE |
Essential supplies:
- Fabric.
- Thread in a matching (or contrasting!) colour.
- Needle, either hand or attached to a sewing machine.
- Pins
- 1/4 inch wide elastic, about a 6 inch length (not shown cause I'm a muppet)
- Ribbon
Optional but highly recommended supplies:
- Penny Arcade D&D podcasts (for bringing the Jim Darkmagic Magic)
- Earphones so's not to upset the neighbours with the above.
- Glasses which are the correct prescription instead of your six year old sunglasses which are not, therefore you cannot see out of them properly, isn't it time you got some new ones, you plonker.
- Graze.com "High Tea" series carrot cake and complimentary teabag.
- A napkin to cover your horrible garden furniture, which was in the shed when you bought the house (the weather hasn't been nice enough this summer to consider replacing it!
OKAY!
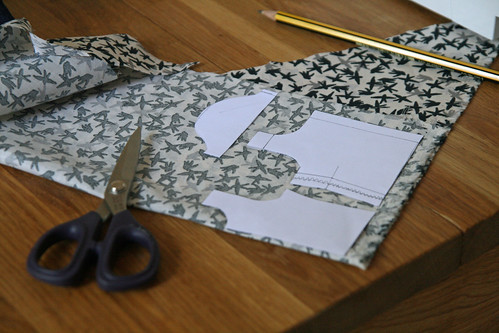
First, cut your fabric into a 16cm by 16cm square. I find it easier to make a paper template to cut around, although you might like to draw straight on the fabric with some tailor's chalk.
 |
| Square cut, oh yeah. |
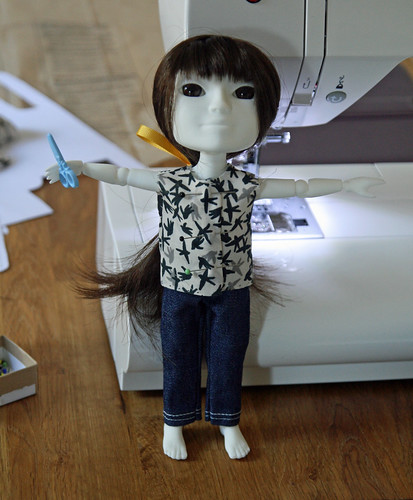
Making sure that your fabric is the right way up (so your birdies aren't flying in a funny direction), fold over 1.5cm at the top edge and pin. Sew close to the free edge to create a little tube at the top of the fabric; this forms your elastic casing and the top of the dress. Remember that your stitches will show on the outside here, so make 'em neat as you can!
 |
| Make sure the birdies are flying the right way up on the main dress! |
Next, fold in half, right sides together. The open edge will be the back of the finished dress. Sew along the back seam, stopping just below the elastic casing.
 |
| Fold in half to make the back seam. S top sewing just below the elastic casing (facing towards us in this picture), leaving the tube open. |
Turn up the bottom of the dress and stitch a neat hem. If you're feeling particularly lazy, you could glue this with some fray-stop. (If you're machine-sewing, you might find it easier to hem before stitching the back seam because of the small diameter tube.)
 |
| Instructions say a NEAT hem, Dr Duckie... |
Turn the dress the right way around. Feed your piece of elastic through the top casing. It may be helpful to put a safety pin on the end of the elastic to give you something to pull through.
 |
| Elastic threaded. Long tails make for easy tying. See what I mean about the stitching showing? |
With both elastic ends sticking out of the dress, slide it on to your Makie and tie it above the bust so's it's nice and snug. Snip off the excess. The dress gathers at the back and your join will be nearly invisible, yaay!
 |
| Make sure you've got enough stretch in the elastic to get the dress on and off! Snip off the loose ends close to the knot. |
Nearly there! No woman likes looking like a sack of potatoes, so add a ribbon belt for some waist definition. You can simply tie this on, or add snaps and elastic. I've just stitched mine at the back.
 |
| Belt, check. Sunshine, check. Looking fabulous, CHECK! |
And there you have it! Celebrate and bask in the sunshine!
The best thing about this dress is that it gives you a great base for some customisation and versatility. Try altering the skirt length; cut your fabric as a 16cm by 20cm rectangle for a maxi dress, or you could go to 12-14cm (depending how daring your Makie is!) for a miniskirted version. Play around with different fabrics, different waist ties and contrasting coloured stitching... or if you're really brave, why not try some embroidery?
Tomorrow, I'll show you a couple of neckline variations that'll be great for adding a bit of individual style, so don't throw away the rest of that ribbon!
Tomorrow, I'll show you a couple of neckline variations that'll be great for adding a bit of individual style, so don't throw away the rest of that ribbon!
Sunday, 10 June 2012
An Embuggerance
Having received the Makie, the next step was to check the fit of all the items that I've spent the last week or so drafting and making up in preparation. The messenger bags are fab, as are the skirt and the glitzy sequinned waistcoat (yet to be shown). The blouse needed a little more work, as in it was a little big across the back and not quite big enough across the front, so that was where I started.
Once the pattern was adjusted, it was time to cut it out...
Once the pattern was adjusted, it was time to cut it out...
Place those bits, yo.
And eventually, to check the fit on Plink...
Yes, you can help... no... put those scissors away, young lady. Please?
Unfortunately, shortly after taking this photo, I was topstitich the front when the machine gobbled up some of the fabric and there was an ominous CLUNK. Having extracted the blouse from the machine, I surveyed the blouse and decided that the damage wasn't too bad, so hand sewed in the sleeves.
On trying to sew the collar, there was an even more ominous... nay... a BODING volley of CLUNKing from the machine, and a refusal to do anything like, you know, sew.
Having disassembled as much as I dare, I can share the news that the timing on my 2 month old, £300+ machine appears to be completely FUBAR'd, as does the computerised mechanism to move the needle. And I've just given my £99, 5 year old machine to my sister.
Definitely an embuggerance.
Wednesday, 6 June 2012
Why have fabric...
...when you can have Liberty Tana Lawn?
Well, given it's around £12-20 per metre is one excellent reason. But where the human has had a past (shall we say) indiscretion, the Makie shall profit. This glorious print featuring little acorns is called "delfie" and although it's not current, it still crops up on the bay of e.

Well, given it's around £12-20 per metre is one excellent reason. But where the human has had a past (shall we say) indiscretion, the Makie shall profit. This glorious print featuring little acorns is called "delfie" and although it's not current, it still crops up on the bay of e.
Subscribe to:
Posts (Atom)