Showing posts with label scraps. Show all posts

Thursday, 27 September 2012

Tutorial: Making the Fuzzy Grey Hat


Well, I've published one crochet pattern on the blog, so I might as well cement my descent into middle-age-ness by publishing this one too...

Fuzzy Grey Hat
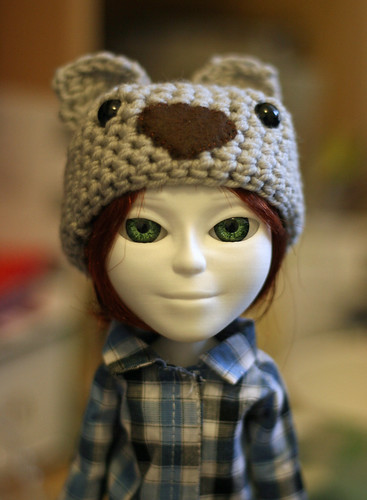
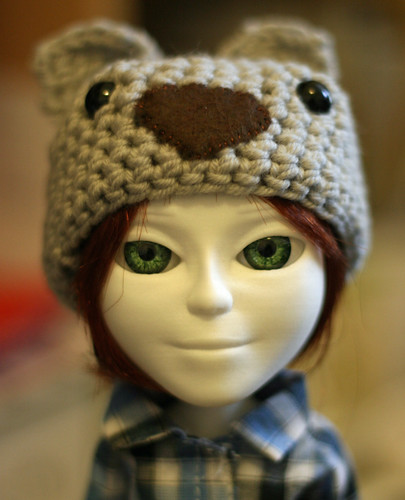
A dodgy photo requiring changing to B+W? NEVAH! 

To make your very own Fuzzy Grey Hat, you will need:
  • 4.0mm crochet hook
  • Fuzzy Grey Yarn! I used a skein of Debbie Bliss Alpaca that Bagpuss the cat had decided to have a party with some time ago. He's not yet been forgiven. It took well under 1/2 a skein to make this hat. 
  • Scissors.
  • To know how to do a magic loop cast-on, single and double crochet.
Once again, I'm not going to be teaching you how to crochet. There are some excellent books out there on the subject (see Bear Hat post for details) or loads of videos on You Tube for you to peruse. I find crochet much easier to knitting and it was really, really fast to pick up. 

Here we go then... arm yourselves. Have a read through all of the instructions before you start... 

Create 6 single crochet stitches into a magic loop. Pull the loop tight. 
Increase [Inc] all six stitches using single crochet; this means you work two single stitches into every stitch, giving you a total of 12 stitches.
Single crochet 1 into the first stitch, then Increase 1 into the next stitch around the 12 stitches [Sc1, Inc 1]  

For the next round, you're first going to chain 3 stitches. Then work in double crochet in the increasing pattern of  [Dc 2, Inc 1]. Your first double crochet stitch will be into the 4th loop from the hook (i.e don't work into the chain you've just created). For the increases, simply work two double crochet stitches into the same loop of the stitch on the row below.

Next round, back to single crochet: [Sc 3, Inc 1]
Next round we're doubling! Remember to chain 3 to start, then [Dc 4, Inc 1] 
Next round! Singles again. [Sc 5, Inc 1]
Increasing done, phew! Chain 3 stitches and work a round of all double crochet, then a row of all singles to finish. Tie off and weave in ends.

You may find you want less height on the hat than this; if you do, leave out the last doubles and just work another single round.
For a more snug fit, you can take a decrease at a couple of points in the last two rounds. I did this in the double row at 2 opposite points.

Now have fun embellishing your hat. I think a cluster of beads would look great... or how about covering the whole darned lot in sequins? Rock and roll! 

Wednesday, 26 September 2012

Fuzzy Grey Hat

It was clear that I wasn't going to get away with failing to provide the Plink a hat, given Melchett was posessed of a leet mad bear one.

The verdict was that something 'snuggly but classy' was required, and the fuzzy grey hat was born.
Fuzzy Grey Hat
Plink practices her Boden catalogue pose
Plink's elected to wear it for the moment with her crystal hair pins (originally designed to stick in floral buttonholes and scavenged from a wedding earlier this year) clustered for decoration, but she's eyeing up my bead collection. I don't think it'll be long before interchangeable embellishments are demanded!

I'm working on a matching scarf at the moment. Hopefully a snuggly ensemble perfect for A/W2012 will be complete by the weekend.

Monday, 24 September 2012

Tutorial: Making the Bear Hat

No sooner was the Bear Hat posted on the Makie Forum than a pattern was demanded!
Wet Sunday
Rawr!
I'm not going to go into how you crochet here; bigger brains than mine have produced some really good books on the subject. The Happy Hooker by Debbie Stoller is how I taught myself, and Creepy Cute Crochet is a really good introduction to simple amigurumi techniques, which is how the Bear Hat was created.

You will need:
  • 4.0mm crochet hook
  • Aran weight yarn (I used Debbie Bliss Cashmerino Aran, which is all fuzzy)
  • Scissors
  • Felt Scraps, co-ordinating thread to stitch them on with. 
  • Teddy bear eyes, these are 8mm ones
  •  Patience and the ability not to crochet yourself to your work. 
Pattern as follows: 

To make the hat:

Create 6 single crochet stitches into a magic loop. Pull the loop tight. 
Increase [Inc] all six stitches; this means you work two single stitches into every stitch = 12 st. 
Single crochet 1 into the first stitch, then Increase 1 into the next stitch around the 12 stitches [Sc1, Inc 1] 
For the next round [Sc 2, Inc 1] 
Next round [Sc 3, Inc 1]
Next round [Sc 4, Inc 1] 
Next round! [Sc 5, Inc 1]
Work around the brim 3 or so times until your hat is the depth you want.  Tie off and weave in ends. 

For the ears:

Decide where you want the ears to be placed, then working in the holes between the stitches of the hat, pick up 4 single crochet stitches for the base of each ear.
Work backwards and forwards as follows:
First row: Chain 1 [Sc 1, Inc 1, Inc 1, Sc 1] = 6 stitches
Next row: Chain 1, Sc all stitches. 
Next row: Chain 1 [decrease 1, Sc 2, decrease 1] = 4 stitches, tie off and weave in ends.

If you're not happy picking up stitches, then you could always work the ears separately off of a chain of 4 stitches, then sew 'em on afterwards. 

Wet Sunday
I can bear-ly believe it!
Once the ears are on, all you need to do is cut your nose shape and stitch it on, then push the eyes through the holes between the stitches. Have fun adding whiskers, changing ear shapes and experimenting with different colours!

It would be pretty easy to make ear flaps for these hats! You just pick up stitches along the brim, work back and forth for a few rows, then decrease at the edges to a point. Finish off by adding a doubled strand of contrasting colour wool and braid to a pretty pleat. 

Sunday, 2 September 2012

Anyone...

...for a Makie apron tutorial?
Cooking with Plink: Quicheything
It's got a heart. She wanted a skull and crossbones. 

On my list of things to do once this week is safely over!

Sunday, 19 August 2012

Garden Party Dress

So here's a little something for those hot afternoons when you've got a formal event to go to.
Garden party
Taadaa!
This light Korean linen wrap dress features a tulip skirt and ribbon belt for that all-important waist definition.
Garden party
Cool and just that little bit sassy.
Okay, okay, so it's pinned at the back, again.
Garden party
Naughty pin!
But really, who wants to make an effort when the weather is so lovely? Might as well go outside and enjoy it!
Garden party
This is my photographer, hiding in the blueberry bush. 

Saturday, 18 August 2012

Sneaky Peek

Here's a little look at the outfit that's going to be unveiled tomorrow.

Garden party

Hope you have a nice evening, see you then! 

Glamping; behind the scenes...

Because not everything is as it seems, and I wanted to show you how I made the tent in case your Makies fancy a break...

Glamping
Suspense!
It's basically a triangle of fabric I used to test overlocker tension on a blouse I was making with a wire hoop and a skirt stitched on. I put a length of black thread through the top and hung it off of my desk lamp, then draped some fancy fabric to disguise the desk detritus.

Still, it works :)

Tuesday, 17 July 2012

Project Runway, Makie Edition

Tim Gunn has nothing on us!

Today's challenge: recreate and reinterpret this faaaabulous vintage look, as modelled by Millie the Minx

Millie, rocking a handbag, beret and gorgeous stripy dress. 
Dr Duckie, designing for her model Plink, decided to keep the simple directional lines provided by the striped fabric, utilising a scrap of Paul Smith shirting fabric she's had floating around for ages. For a more modern look, she's updated the skirt, reducing volume. Lengthening to floor level gives this the option to be worn as a sunny-day maxi or an elegant evening look.
Project Runway, Makie-style
Plink, modelling Dr Duckie's creation.
Dr Duckie adds contrast stitching for interest instead of the slightly more whimsical rick-rack of the original.
Project Runway, Makie-style
Topstitching? Isn't that how you broke your machine last time?

And in the finest traditions of Project Runway, the model has been sewn into her dress!
Project Runway, Makie-style
Yes, the back could be tidier.
Am I through to next week, or is Heidi going to be sending me home?

Wednesday, 6 June 2012

Why have fabric...

...when you can have Liberty Tana Lawn?

Well, given it's around £12-20 per metre is one excellent reason. But where the human has had a past (shall we say) indiscretion, the Makie shall profit. This glorious print featuring little acorns is called "delfie" and although it's not current, it still crops up on the bay of e.