I'm here, I'm vaguely alive, this is good.
It's been a horrible week on call.
I'll be drawing the giveaway tomorrow evening; entries for it are now closed as per my original post.

Monday, 14 January 2013
Friday, 11 January 2013
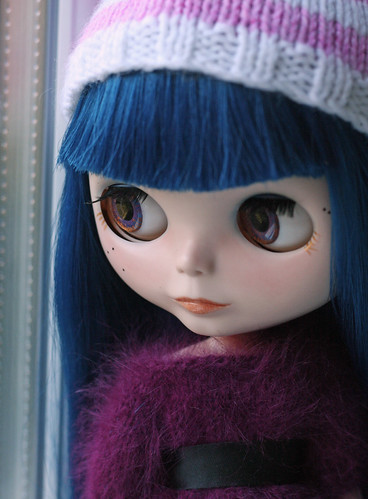
Plum
We've had a flirt with lots of different names, but Plum seems to be the one we're coming back to.
She's still not finished. I've got to get her MSC'd, finalise the eyelids and the blush and I've finally ordered the bit to fix her eye mechanism, huzzah, but at least I know her name now.
 |
 |
Sunday, 6 January 2013
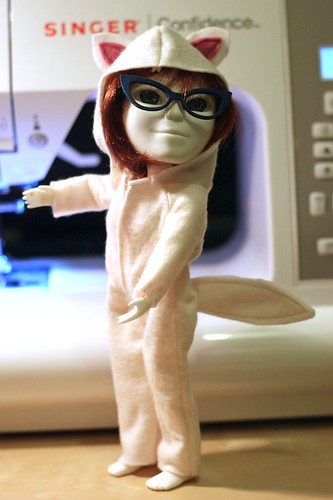
Tutorial: Turning the Hoodie into a Wolf Suit
Yes yes. Calling it a tutorial might be a little bit rich, but we'll take a bit of a liberty.
For ease of finishing, the suit is made from felt. This means you don't need to worry about hemming edges and other fiddly stuff.
To make your own wolf suit, you will need:
You'll note I'm only using the front piece of the hoodie pattern. The original is slightly asymmetrical, in that the back is narrower and the sleeve edge a little differently shaped, but I find you need the width in a non-stretchy fabric and the sleeves fit just fine.
Cut out your trouser legs. The gap in mine measures 1cm in width at the ankles.
Next, take your hood piece. Draw a line where you'll be attaching your ears. I did mine 6cm back from the upper point of the hood.
Then take your sleeve piece...
Once you've got your pattern pieces, read all these instructions three times before proceeding. I used 0.5cm seam allowances throughout my construction, and the fit is pretty good.
Once the ears are inserted...
This is the point where you try on to your Makie. Trim the sleeves and trousers to a good length (this is part of the beauty of using felt to make this costume; you don't have to worry about hems and cuffs!), and trim the hood edge away from the face if you need to.
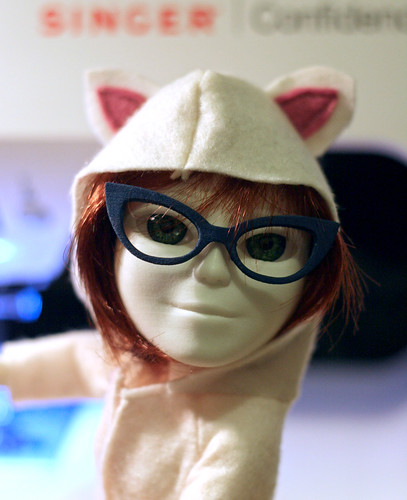
So here's the lovely Melchie modelling the prototype wolf suit:
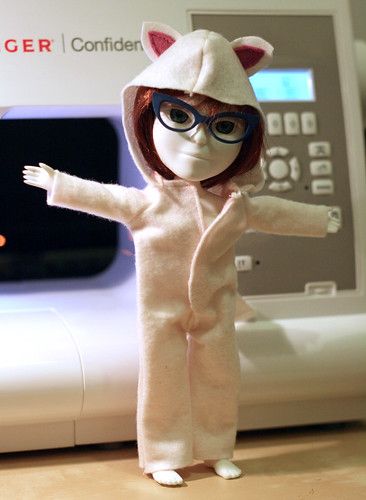 |
| Rawr, innit? |
To make your own wolf suit, you will need:
- The MakieLab hoodie pattern and instructions, which you can get here. You will be using the FRONT, SLEEVE and HOOD pieces only. We will not be attaching the hood casing. I only use one of each piece and cut out with my fabric doubled.
- Some A4 paper
- Pens and a ruler
- Fabric marking pencil
- Felt fabric measuring about 40 x 30 cm
- Felt scraps to make ears and a tail. You don't have to do a wolf!
- Snaps or velcro to close
- Thread and needles. Although I used a sewing machine, you could do this entirely by hand
- Scissors
Are we ready? Let's go!
Print off and cut out your hoodie pattern, making sure you've got the right scale.
Print off and cut out your hoodie pattern, making sure you've got the right scale.
Take the FRONT hoodie piece, cut it in half along the centre front line. Reconstruct the pieces on your piece of A4 paper, but with a 1cm gap between them:
 |
| I find a bit of double-sided sticky helps to keep these in place whilst you draw the rest of the pattern. |
Using your pens and a ruler, you now need to draw around your pattern pieces to make one piece that looks like the shape in this picture:
 |
| The TAIL goes on the back piece, the OPENING goes on the front piece. To find the mid point, measure along the original bottom edge, then use this to work out where the rest of the lines go. |
Cut out your trouser legs. The gap in mine measures 1cm in width at the ankles.
Next, take your hood piece. Draw a line where you'll be attaching your ears. I did mine 6cm back from the upper point of the hood.
 |
| I get sharpie EVERYWHERE when I use it. |
 |
| Nice to know, isn't it? |
- Cut two of every piece from your fabric. Remember that if you're cutting on a single layer, you'll have to flip your hood pieces so you get two opposite-shaped pieces (alternatively use both of the hood pieces from the original MakieLab pattern).
- Mark your front opening, tail slit and ear slits on the fabric pieces using a chalk pencil.
- Snip the inverted 'Y' shape on the front piece. Fold the raw edges to the inside and topstich along the opening in a 'U' shape. This gives you an easy way to get the Makie in and out of the suit.
- Snip along the tail slit opening on the back piece. Make your tail, insert it into the opening on the right side.
- Fold the back piece in half, right sides together, sandwiching the tail, and sew the opening closed 0.5cm away from the edge.
 |
| Insert the tail from the right side, then fold the whole piece in half along the line of the slit. |
 |
| Sew to close the gap and fix the tail |
- Snip the ear slits and insert the ears in the same way as the tail. If your ears have contrasting 'inner' bits, make sure they're facing the right way before you sew!
 |
| Make sure your contrasting inner ear bits are facing forwards, towards the hood opening. Fold the hood piece in half along the line of the slit, like you did for the back piece. |
 |
| Sew across the base of the ear to close the opening. Repeat in exactly the same way on the other hood piece :) |
- Follow the MakieLab instructions for sewing the sleeves to your front and back pieces.
- When you get to sewing the underarm seam, simply continue along the side seam down to the bottom of the trousers.
- Sew the inner leg seam and turn the suit the right way out.
- Sew the hood pieces together as per MakieLab instructions. DO NOT SEW THE BOTTOM EDGE OF THE HOOD INTO A RING, leave it open.
- Pin the hood to the suit with right sides together, leaving an equal gap at each edge. I find this is easier if you find the midpoint of the back piece and pin this to the hood seam, then attach everything equally
 |
| Blue arrow shows the midpoint of the back piece. Match this up with the hood seam to place your hood in the middle. |
Once you're happy with the fit...
- Attach your snaps or velcro to the front openings.
- Pose.
- Prowl.
 |
| If you want, you could extend the sleeves over the hands and attach claws. Eyes and a nose on the hood could look cute. Why not attach a row of teeth around the hood opening! |
Taadaa! We're done. Have a cup of tea! Oh, and take photos and share them!
If there are any bits you're not sure on, chuck a question in the comments and I'll do my best to help.
If there are any bits you're not sure on, chuck a question in the comments and I'll do my best to help.
Saturday, 5 January 2013
It's a wolf suit. Naturally.
Well. It started with a bit of an odd statement on the forum...

And then there was a photo...
And then there was a bit of an idea of how to do it, which means that as there's revision to be put off, so I'm looking for *any* distraction whatsoever, there had to be a proof of concept!
This little wolf suit is based on the MakieLab hoodie pattern, which is available in PDF form on the forum. The lower edge is simply extended by about 10cm to form the trouser section, and a 1cm extra width is added to the middle of the front section to facilitate the front edge opening. Construction is pretty much exactly the same, although slits are cut for the ears and tail, which are stitched in before the suit is assembled.
I'll see if I can get a pattern and a tutorial up at some point soon, but as I'm spending next week attached to the Big Red Bleep and my rather scary exam is coming up rather fast, you might have to make do with a shot of the pattern pieces and a basic set of instructions... both of which I'll post tomorrow :)

And then there was a photo...
 |
| Photo by the lovely Fil's lovely SiL, who found the snowman on evilBay |
|
| No fastenings, it's only a prototype... |
|
| Look! A tail! |
 |
| Go on, Melchie. Get the instructions written... |
Friday, 4 January 2013
Another Giveaway? Woo!
So it turns out that Plink is not a fan of her tartan dress wot is made with lovely fabric that the Fil sent me, and she's decided that another Makie is deserving of it.
This dress is hand-sewn from a beautifully soft fabric that was an unexpected present from the Fil. It fastens at the back with two snaps and has crochet lace around the neck and hem, and three tiny buttons.
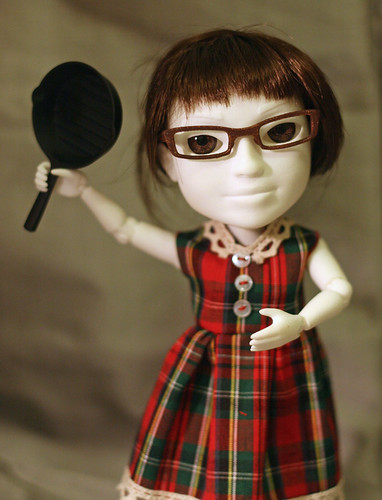 |
| You don't get the frying pan... |
As it's hand sewn, this garment will not stand up to rough handling or children.
To be in with a chance of winning the dress, leave a comment on this post by noon GMT on Monday the 14th of January. I'll pick the winner once I've woken up from my snooze post night shift!
Good luck! :)
Thursday, 3 January 2013
Le gasp!
2013 is obviously destined to be a year of peace. Well. It is if this cat-truce is anything to go by!

Tuesday, 1 January 2013
Happy New Year...
Oh dear me. Well. I wandered into the study this morning to find the collected Blythes in a flurry of righteous indignation. Apparently, they'd had a bit of an interrupted night and wanted me to know exactly how unhappy with it they were.
Turns out that after a rather civilised dinner party, Plink and Melchie had decided to go hard rather than going home to watch the New Year in with Jools Holland and had caused a bit of a rumpus... unfortunately, I'd woken up before the Makies, and was able to procure evidence of misdeeds from my iPhone...
 |
| Looks like things started off sensibly enough. |
 |
| Champagne is traditional, I suppose. |
 |
| Oh, good grief. |
 |
| Plink... what... that's a stuffed hedgehog. Where did that even come from?! |
 |
| *sigh* |
 |
| Aargh! How'd she even get up there?! |
 |
| 2AM, this was taken. Explains the smoke alarm going off. |
 |
 |
Subscribe to:
Posts (Atom)