Showing posts with label fabric scraps. Show all posts

Saturday, 30 March 2013

Makie Me: A Comfy Kimono


Here at Makie Couture, we're big fans of sleepwear. In fact, we're often to be found securely in our snuggly pyjamas before the clock has struck six pm.

Plink, about to crash out in her PJ's
This tute'll demonstrate how to make a comfy kimono for your Makie (or Blythe) to wear when they're in the mood for some mega lounging around.
Comfy, cosy and fab. 

You will need:

  • A piece of fabric, about 10 inches by 6 inches. 
  • Some ribbon, about 18 inches long. 
  • A piece of A4 paper
  • Ruler and pencil
  • Chalk pencil
  • Needle and thread; you could use a sewing machine. 
  • An iron is handy. 
First of all, make your pattern pieces. This is dead simple, they're both rectangles. 2 x 2" for the sleeves, 3.5 x 5" for the body piece. 

The sleeve piece is the small piece. The body piece is the big piece.
Note that both pieces need to be cut on the fold of the fabric.
Fold your fabric in half, align your body piece against the fold and cut out.
Then cut out two sleeves, again making sure that each is on the fold.

Unfold your pieces and mark the midpoints with your chalk pencil.

Red dots = midpoints of fabric. 

Matching the midpoints and with right sides together, sew the sleeve pieces to the body piece with a scant 1/4 inch seam.
I've already finished the sleeve openings here.
It's easier to do it at this point than when the kimono is assembled!

Flip open the sleeves like the pages of a book and iron flat. You should have a cross shape like below.

Folding the kimono with right sides together to make a 'T' shape, sew along the red lines. This completes the side and underarm seams.
If you're using a sewing machine, pivot at the corners.
For a neat finish, snip at a 45 degree angle into the underarm corners.
Don't do what I did and snip half of the kimono because you are TIRED and ILL. 

On what is to be your front, measure and mark the middle with your chalk pencil. Where the neck opening is to be, mark 3/4 of an inch on either side in a 'T' shape.
Marking the opening is really, really helpful :) 
Cut along the chalk lines and turn your robe the right way out. Fold back the neckline and press with your iron. 

Already looking good! 
Nearly there! All that's left is to apply ribbon to the open edge. It might be neater to do this by hand, but I used a decorative zig-zag stitch and a bit of caution. If you haven't already, neatly hem the bottom and sleeve openings.
Pink makes us HAPPY. 
You should have just enough ribbon left over to make a tie belt. Slip on your lovely new robe and go relax!

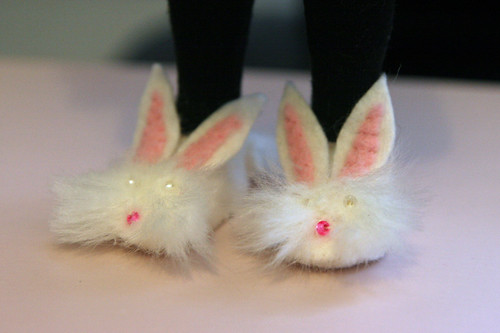
It's loafing time!
Just need to nick Melchie's fluffy bunny slippers...


Sunday, 21 October 2012

Steamplink and Madame Von Melchie

Ahahahaaa!

Finally, I can let you into the sekrit of the costumes we've been working on for the last month!
Steamplink and Madame Von Melchie
Just put some gears on it and call it steeeeeeeeempunk!
Steampunk is fantastic, as far as I'm concerned. I've got a whole Pinterest board devoted to the collecting of steampunky ideas, and I've been dying to make a Makie-sized steampunk costume for ages. Happily, the Makie Meet gave me the perfect excuse to make two!

Here's the Steamplink. Obviously involved in the science side of things, she's probably an airship engineer or the like.
Steamplink and Madame Von Melchie
Okay, yes. The gears have no purpose. So hit me with sticks. 
Her boots and belt are from Collectible Kitbash and are seriously high quality. The boots have even got hobnails on them!
Steamplink and Madame Von Melchie
Up, up and awaaaaaaay!
Madame Von Melchie is more of a lace-and-arsenic sort.
Steamplink and Madame Von Melchie
Shall we dance? Or shall I poison you? Either way is good...
Her hat is essentially felt, fabric, glue and more glue. The skirt has wire in the hem to help it hold its shape. There's a 3-layer bustle on the back, which is happily not held together with glue. That's a chicken feather in the hat, by the way.
Steamplink and Madame Von Melchie
No, she wouldn't take off the fluffy bunny slippers.
I'm delighted with the costumes, especially Plink's wings and goggles. Many huge hugs to the Jo for sending me the watch faces!


Wednesday, 10 October 2012

Paper Hat: The Tutorialinginginging...

Goodness. We're going to end the run of hat-based tutorials and postings soon, I promise. It's probably something to do with the change in the weather! As the evenings draw in and the wind gets... erm... windier... there's nothing better than curling up and making some outerwear!

Anyway. As promised, here's a guide to making your very own paper hat, Makies for the wearing of. This is adapted from a classic paper hat fold you can do with a £5 note, either for leaving as a pretty tip or for annoying bus drivers. Hahaha.
'loes Sailor
Smart, eh?
You will need:

  • Fabric measuring 12.5cm by 20.5cm (roughly 5" by 8 1/4")
  • Iron and ironing board
  • Needle and thread
  • Fray check
  • Scissors
Depending on the wibblyness of your fabric (technical term), you might need to interface it for added stiffness (fnaar). I would advise that you fold up a test hat and see what your fabric is going to do; although feeling flimsy when flat, the quilting cotton I used is surprisingly sturdy once folded and interfacing is really not needed.

Okay! Let's get folding. First thing, a warning:


You will be using a iron to crease all of your folds. Although you could use the heat only, you will most likely need steam to set the creases. The steam shoots out in all directions. 
You are very, very likely to get burnt fingers if you're not paying attention to what you are doing! 
Do not attempt to make these hats with small children, pets or wayward Makies distracting you! 


Crystal? Right. Read through all the steps, then have a go. If you're not clear on how the folding works, try it with a piece of paper before you move on to the fabric.

First, lay your fabric face down on the ironing board. Fold over 0.5cm ish at each end. This gives you a nice finish on the bottom opening of the hat.
Paper Haaaaatses
Flat, flat, flat. Fold ends and iron.
Fold the fabric in half, pattern out. Iron the fold. Lay folded fabric on your ironing board, opening towards you.
Paper Haaaaatses
Opening at the bottom, or you'll not get into your hat. 
Fold in the corners and iron flat.
Paper Haaaaatses
Find the middle first!
Bring the open edges of the fabric up over the triangle. Iron. It's easier to do one side, then flip the hat over and do the other.
Paper Haaaaatses
Opening still towards you, yes! 
Fold the nice finished edge down to make the outside bottom of the hat. Iron. This is where you're most likely to burn yourself.
Paper Haaaaatses
Basically fold the flat bit in half, so's there's a nice finish. Flatten with the iron. 
Congratulate yourself on having some fingers left. Switch off the iron, breathe a sigh of relief.
To finish the hat, you need to do a few little sewing stitches at the red dots. I just overcast a couple of times and make sure it's secure. For a smart finish, trim the edges marked by the arrows and apply a little fray check to stop... well. Fraying.
Paper Haaaaatses
Stitch through all layers at the dots to hold the hat together. Trim and fray-check at the arrows.
Hats don't have to be just one size! As long as you keep the proportions, you can make any size you like. The tiny hats started off about 7cm wide and have got a hairgrip stitched into the bottom to keep them in place. They could do with a little wire in the brim to hold them open... time to experiment!
Plink, play nice.
"Little haaaaaaaaatses!" "Hey! Plink! Play nice!"


Wednesday, 3 October 2012

I am so good to them...

Following Melchett's admiration of the paper hat, I had to track down some newspaper print fabric to make her her own version. 


Excuse the blurry photo, it's a bit late for such shenannygoats!

I'll be posting a tutorial for this once I've figured out the ideal starting size rectangle of fabric. This one is too tall in the crown.

If you want your own newspaper print fabric, there's a variety available here. I purchased a fat quarter, which is more than enough for a few hats... guess I might have something to swap at the Makie Meet after all! 

Sunday, 30 September 2012

Good grief...

Hullo and welcome to the lab!
Is there something on my feet?
(She won't take the bear hat off you know. I've tried.)
... huh... what's that? There's something on my feet?
Is there something on my feet?
(Bears, elephants and bunnies on one Makie? Surely some sort of record.)
Oh... these are just my EXTREMELY AWESOME FLUFFY BUNNY SLIPPERS.
Is there something on my feet?
(I'm a medical professional and everything. I'm getting too old for this. *sniffle*)
Oh yeah!

Saturday, 22 September 2012

Sewing for Humans: Stethoscope Cover

A bit of a digression from Makie-ness today, but I decided it's time to make something for myself again!

Us doctors are rather fond of our stethoscopes. They're an essential bit of kit for day-to-day work, and they get a fair bit of abuse.

Unfortunately, my previous model took rather too much abuse over the last 4 1/2 years, and has just ended up doing the above...
Untitled
Boooosplit.
Yeah. Split. This means the acoustic is stuffed and I can't hear a thing. Not so good when you're trying to hear whether or not there's a pneumonia or heart murmur. It's happened because I tend to drape my tubes around my neck, where the lipids from my skin have reacted with the plastic and made it brittle.

So after a delve into the bank account for a new model (ouch), I've decided that a funky fabric solution is needed to avoid further splittage and financial distress.
Untitled
Classy!
If you've got a medic in your life, why not make them one of these? It's dead easy.

You will need:
  • Fabric strips 2.5" wide, 14" long. 
  • Needle and thread
  • Iron
  • Snap fasteners
A sewing machine is helpful.

First, gather your fabrics. These are from a Moda "Jelly Roll", which is a type of quilting collection. They're the perfect width for making stethoscope covers. 
Untitled
Funktastic

With your trusty iron and without ironing your fingers, fold all the edges under 1/4" and press. 
Untitled
Fold and iron.

Take a moment to get distracted by the squirrel attacking the bird feeder in the garden.
Naughty Squirrel
You are a squirrel, not a woodpecker. Note the bemused pigeon.

Sew around the edges. I find you get a neater finish if you do the long edges before the short edges. 
Untitled
From sewing and snapping.

Grab a needle and thread, chuck something suitable on netflix and sew on your snaps. One on each end and one in the middle will do. 

Attach the cover to the stethoscope and go strut your stuff on the wards. When the fabric gets a bit grubby, just snap it off and sling it in the washing machine. 
Untitled


Saturday, 18 August 2012

Glamping; behind the scenes...

Because not everything is as it seems, and I wanted to show you how I made the tent in case your Makies fancy a break...

Glamping
Suspense!
It's basically a triangle of fabric I used to test overlocker tension on a blouse I was making with a wire hoop and a skirt stitched on. I put a length of black thread through the top and hung it off of my desk lamp, then draped some fancy fabric to disguise the desk detritus.

Still, it works :)

Sunday, 12 August 2012

Glamping!

"Ah, August! When the weather turns from cloudy, grey and miserable to... hrum. Well. Cloudy, grey and miserable, but with added muggy hotsweatyness at nights. Blech.

Definitely time to get away from it all, so I've packed up most of the lab (the Giant Squid can be trusted to feed the sharks) and decided to head out into the country for a couple of days.


Happily, us Makies don't have to make do with a muddy field and khaki-coloured Eurohikes. No no. We go Glamping, Shabby-chic style!
Glamping
Scenic surroundings, naturally. 
This fabulous tent comes with full mod-cons.
Glamping
Coffee! What more could a Makie need?
Delightful vintage linens...
Glamping
Squidgy bedroll, mmmmm...
And most importantly, complementary champagne!
Glamping
Perfectly chilled, hoorah!
Cheers! Have a superb summer!"

Monday, 9 July 2012

Effortless Elegance

You don't need a whole host of draping, cutting and sewing skills to produce an elegant Makie Couture look; this design took all of five minutes to put together (and three of those were spent digging out the fabric).
Jersey Couture
Yes, we probably could have found a more classy posing location.

This slightly bustled  strapless evening gown features achingly trendy unfinished edges, classic lines and is quite literally a rectangle of jersey fabric, twisted at the back and held in place by two dressmaking pins. Not a single stitch was sewn.
Jersey Couture
Black and White makes everything look like a Vogue shoot.

This photo shoot definitely illustrates that I've been around too many weddings this weekend.
Jersey Couture
Oh, what? At least I'm not asking you to do all the cheesy poses.

Although it did mean I got to snaffle the plastic diamond-topped pins from the corsages, which are perfect for Makie up-dos. Similar to constructing the dress, I've found I get a really good hold on the wig just by twizzling the hair and pinning in place. If only mine were so well-behaved.
Jersey Couture
And twist and pin and done. 
So there you have it. Classyness and poise, all with a bit of fabric the size of a hanky and a couple of pins. Worth a go, yes?

Wednesday, 27 June 2012

Is it a bird? Is it a plane?

This morning, my quiet 'lie in bed and catch up with twitter before I get up' time was interrupted by what only can be described as a kerfuffle from downstairs. There were bangs. There was the odd clang. There were sounds of a distressed cat or two.


When I descended, this is what I found cowering in the windowsill. 
Superplink!
This is Pirate. He is not happy.
And this is what I found bouncing around my sewing kit on the dining room table. 
Superplink!
Oh ye gods. Where did she get that from? 
Yeah. I've got no idea either. Apparently, this is 'Superplink', and Superplink doesn't have to do things like listen to her human. Apparently, Superplink does things like stand on precipices and moodily survey her surroundings. 
Superplink!
Superplink moodily surveys the vegetable beds.
She likes to pose, hands on hips.
Superplink!
Superplink moodily surveys the decking. 
Then she likes to zoom off. Noisily. 
Superplink!
Ta-da-da-daaaaa! SUPERPLINK!
She's also fond of supervising blog posts.
Superplink!
No... there's a comma there. Not there, that's a semicolon. Type faster, dammit.
was thinking of getting a second Makie. Now I think one might be quite enough.
Superplink!
Oi! Gerroff! That is most definitely MY wine! Oi!